
首先,很抱歉更新的这么晚。这段时间由于本人学业原因,前前后后鸽了将近一个月的时间,一直没有空写博客,就暂时搁置了博客的更新计划。
话不多说,让我们开始今天的内容。
(编程范式净讲一大堆没用的东西,还有,谁家好人要求 4 个星期速通 JavaScript 和 RxJS 的?上来就是 arrow functions,一点解释都没有,CE 一个人写的笔记更是写的依托答辩,难的跟天书一样,quiz 还基于这些笔记,你说这门课难,自己作的你也知道数据难看啊?只能说 QS 前 100 大学里面能搞出抽象课程的 CE 也是大有人在,至少我已经遇见 2 个了)
废话部分
在 gtkmm 的开发中,组件(widget)是窗体的必要组成部分。但严格地说,组件这个概念非常宽泛——它可以指按钮,复选框,甚至是……用于放置其他组件的容器。对于后者来说,我们称之为不可视组件,它们与可视组件形成层级关系,其目的只是为了便于组织管理其他可视组件。
在某些系统中,它还有另一个名字:控件(control)。
另一个必不可少的组成部分是信号(signal)。前一节我们提到过,GTK 是事件驱动型工具包,因此信号的重要性不言而喻。它是指在与窗体内的组件交互(例如单击,双击,长按,滚动等)时,该组件的反应(类似于手部神经末梢接受刺激后神经冲动沿着神经元传递到大脑皮层,然后生物做出反应)。
简单示例
开始之前
我们需要使用 gtkmm/button.h 和 gtkmm/window.h 头文件完成这一部分。
这样的好处是按需导入,避免出现因使用整个 gtkmm.h 而拖慢编译时间的情况。
Glib::ustring 介绍
Glib::ustring 是 gtkmm 内定义的一个数据类型,用法和标准的 std::string 几乎雷同。不同的是,在某些系统内,std::string 中的每个字符最大仅能支持 8 位字节长度的编码(一般来说,中日韩文字需要的编码都超过 8 位),而 Glib::ustring 采用国际惯用的 Unicode 编码(更准确的说,应该是 UTF-8),可以有效避免这一情况。
实现简单组件
对于初学者而言,我们会将窗体类和 main 函数放在一个文件(或者文件夹)中。但是在实际的生产环境下,为了方便管理代码,并防止 main.cpp 过大导致难以搜索,更加推荐的做法是将类函数及其方法实现分别放在一个头文件和一个 .cpp 文件中(请注意,源文件必须与头文件同名)。
例如,我们可以使用下面的文件目录结构来存放头文件和源代码:
xxx (Project Name)
 ├─include
 │    ├─header_a.h
 │    └─...
 │
 ├─src
 │  ├─header_a.cpp
 │  └─...
 │
 ├─tests
 │   ├─test_a.cpp
 │   └─... (Other test files/framework configurations)
 │
 ├─... (Other files/folders)
 ├─.gitignore
 ├─main.cpp
 ├─CMakeLists.txt
 └─README.md
请注意,这并非是唯一解,只要符合规范即可。
接下来,我们先在 include/helloworld.h 中定义一个窗口:
#ifndef HELLOWORLD_H
#define HELLOWORLD_H
// In some IDEs, we may use #pragma once, and without #endif

#include <gtkmm/button.h>
#include <gtkmm/window.h>
// Just include what you really need, like in Python

class HelloWorld : public Gtk::Window {

public:
    HelloWorld();
    ~HelloWorld() override;

protected:
    // Signal handlers:
    void on_button_clicked();

    // Member widgets:
    Gtk::Button m_button;
};

#endif // HELLOWORLD_H
在 src/helloworld.cpp 中实现这个类的方法:
#include "../include/helloworld.h"
#include <iostream>

// Create a new button with label "Hello World"
HelloWorld::HelloWorld(): m_button("Hello World") {
    // set the margin around the button
    m_button.set_margin(10);

    // packs the button into the window
    set_child(m_button);
    set_title("Hello World");
    set_default_size(200, 120);
}

// Destructor (Do nothing by default)
HelloWorld::~HelloWorld() {}

// This must be defined for binding event to the button
void HelloWorld::on_button_clicked() {
    std::cout << "Hello World\n";
};
记得更新 CMakeLists.txt(其实 CLion 会自动完成这些)。
绑定信号
要绑定信号,我们需要使用 connect 函数。顾名思义,它的作用是将某个信号和相应的信号处理程序(或者说是结果,这是我胡乱编的)绑定在一起。
它的用法如下:
// IMPORTANT: bind the event to the button
m_button.signal_clicked().connect(sigc::mem_fun(*this,
    &HelloWorld::on_button_clicked));
其中,signal_clicked() 指的是按下某个按钮时的触发的信号。至于后面的 sigc::mem_fun 函数,官方的解释比较复杂看不懂就对了,我也看不懂,当然我们在使用的时候只需要记住它的用法:对象本身 *this + 目标函数(例如上面的 on_button_clicked,注意此时没有传入参数,不需要加括号)。
如果方法内有参数或者方法声明为 static 类型,最有效的方式是采用 C++ 11 引入的 Lambda 包装器:
// Assume filepath is std::string and already exists
m_button.signal_clicked().connect(
    [filepath]() {
        CustomUserInfoWindow::export_userinfo(filepath);
    }
);
这样既能保证在某些情况下包含必须的参数,又能在无参数或非 static 类型时使用(此时用于捕获外部变量的 [] 需留空),非常灵活。这也是在 gtkmm 开发中常用的方式。
接下来,我们将代码加入到上面的 helloworld.cpp 内:
#include "../include/helloworld.h"
#include <iostream>

// Create a new button with label "Hello World"
HelloWorld::HelloWorld(): m_button("Hello World") {
    // set the margin around the button
    m_button.set_margin(10);

    // IMPORTANT: bind the event to the button
    m_button.signal_clicked().connect(
        []() {
            HelloWorld::on_button_clicked();
        }
    );

    // packs the button into the window
    set_child(m_button);
    set_title("Hello World");
    set_default_size(200, 120);
}

// Destructor (Do nothing by default)
HelloWorld::~HelloWorld() {}

// This must be defined for binding event to the button
void HelloWorld::on_button_clicked() {
    std::cout << "Hello World\n";
};
请注意,如果 connect 函数缺失或参数有问题,按下按钮是不会有任何反应的,包括在控制台内!
运行程序
先完成 main.cpp(不要管注释,我复用的之前的代码,因为我懒):
#include <gtkmm/application.h>
#include "include/helloworld.h"

// As you can see this one is much simpler than WinMain and even Qt.

int main(int argc, char *argv[]) {

    auto app = Gtk::Application::create("org.gtkmm.examples.hello_world");

    return app->make_window_and_run<HelloWorld>(argc, argv);
}
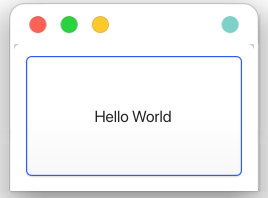
编译运行代码,不出意外的话会出现这个界面:
单击按钮,在控制台内应该会有信息:  上面的
上面的 MESA-INTEL 警告信息不用管,这是因为开发者还没有实现这些功能。
但是,如果你的控制台内出现了如下警告:
Gtk-WARNING **: 23:40:39.776: Unknown key gtk-modules in /home/$USER/.config/gtk-4.0/settings.ini
是因为系统在安装 gtkmm 时错误地在 GTK 4 的配置文件中加入了某些目前已经被弃用的 GTK 3 配置信息。
要修复这一问题,请按照路径打开 settings.ini 文件,删除或注释掉这一行:
#gtk-modules=colorreload-gtk-module:window-decorations-gtk-module
这样再次编译运行时,警告就不会再次出现了。
如果单击一次按钮后,出现了一次“Hello World”信息,那么恭喜,你已经完成了绝大部分内容!
综合使用
这里,我们实现一个在单击按钮后,导出当前时间日期、登录用户名和 tty 终端名称为文件的简单应用程序。
背景知识
获取时间和日期
在 C++ 中,chrono 和 ctime 头文件可用于获取当前时间和日期。例如:
// get current time point (not a string of time)
auto now = std::chrono::system_clock::now();

// convert time_point type to time_t
std::time_t t = std::chrono::system_clock::to_time_t(now);

// convert time_t to string
std::string time_str = std::ctime(&t);
从上面可以看出,输出时间和日期,最少需要 3 行代码。
获取当前登录的用户名
这个涉及到的函数是 std::getenv,原理是利用系统的环境变量输出。需要导入 cstdlib 头文件。例如:
const char* username = std::getenv("username");
或者用 getpwuid(getuid())(需要导入 pwd.h 头文件)获取更完整的信息。
获取终端路径
使用 ttyname(STDIN_FILENO) 可以获取当前终端设备的路径,例如 /dev/pts/0。举个例子:
const char* tty = ttyname(STDIN_FILENO);
特别需要说明的是,使用这个函数需要导入头文件 unistd.h。
文件读写
C++ 内置了文件读写的库,名为 fstream(C 语言中文件读写常用的 FILE* 指针定义于 stdio.h 内,和标准的输入输出函数一个位置但是我们说好了不讲 C 语言的)。使用方式也很简单,如果你熟悉 C++ 默认的输入输出函数,那应该不成问题。
我们还是看两个例子:
// Method 1: determine file name when defining the file I/O stream
std::ifstream fin_eg1("example.txt");
std::string str;
fin_eg1 >> str;
fin_eg1.close();

// Method 2: determine file name later (recommended)
std::ifstream fin_eg2;
fin_eg2.open("example.txt");
// (the others remain the same...)
fin_eg2.close();
std::ofstream 的用法和上面的大同小异,这里就不再赘述了。
实现步骤
按照之前的步骤,我们先实现 userinfo.h 的内容:
#ifndef USERINFO_H
#define USERINFO_H
// In some IDEs, this could be #pragma once

#include <gtkmm/button.h>
#include <gtkmm/window.h>

class CustomUserInfoWindow: public Gtk::Window {
public:
    CustomUserInfoWindow();
    ~CustomUserInfoWindow() override;

protected:
    // Signal Handlers (like on_button_clicked)
    static void export_userinfo();

    // Member Widgets
    Gtk::Button prompt_button;
};

#endif //USERINFO_H
接下来,在 useinfo.cpp 内实现方法:
CustomUserInfoWindow::CustomUserInfoWindow():
    prompt_button("Get User Info") {
    // set the margin around the button
    prompt_button.set_margin(10);

    // IMPORTANT: bind the event to the button
    prompt_button.signal_clicked().connect(
        []() {
            CustomUserInfoWindow::export_userinfo();
        });

    // packs the button into the window
    set_child(prompt_button);
    set_title("Hello World");
    set_default_size(200, 120);
}

CustomUserInfoWindow::~CustomUserInfoWindow() {}

void CustomUserInfoWindow::export_userinfo() {
    // get current time point (not a string of time)
    auto now = std::chrono::system_clock::now();
    // convert time_point type to time_t
    std::time_t t = std::chrono::system_clock::to_time_t(now);
    // convert time_t to string
    std::string time_str = std::ctime(&t);

    // get current username
    const char* username = getenv("USER");
    // not username; please use linux env vars

    // terminal name (tty)
    const char* tty_name = ttyname(STDIN_FILENO);

    // make output
    std::ofstream fout("user_info.txt", std::ios::app);
    fout << "----------------------------------\n"; // dividing line
    fout << "date: " << time_str;
    fout << "username: " << username << "\n";
    fout << "tty_name: " << tty_name << "\n";
    fout << "----------------------------------\n"; // dividing line
    std::cout << "User info exported!\n";
    fout.close();
}
最后,在 main.cpp 中:
#include "include/userinfo.h"
#include <gtkmm/application.h>

int main(int argc, char *argv[]) {
    auto app = Gtk::Application::create("org.gtkmm.examples.widgets-integrated");

    return app->make_window_and_run<CustomUserInfoWindow>(argc, argv);
}
结果展示
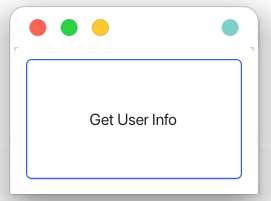
编译运行,结果应该是这样的:
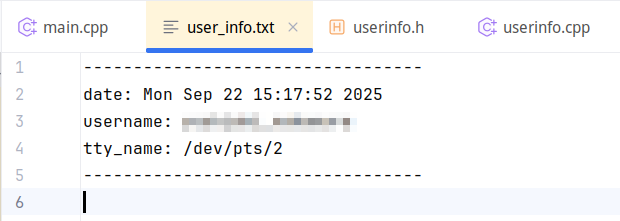
单击 “Get User Info”, 我们会在 user_info.txt 内看到如下内容:

后续内容
下一节,我会深入讲解 Gtk::Button 的内容,和它的几种不同类型,比如 ToggleButton,CheckButton 以及 RadioButton 等。相应的,我也会讲解如何引入自定义的图标,以及如何隐藏窗体的标题栏。
参考
gtkmm Tutorial Chapter 3. Basics: Widgets
gtkmm Tutorial Chapter 3. Basics: Signals